A soft gust, a passing truck, a commentator’s breath—any of these can wreck a good recording in an instant. Microphone windshields are simple in appearance yet engineered to solve a messy acoustic problem: turbulent air hitting a sensitive transducer. This article explains in detail what a microphone windshield does and how it works acoustically, from the physics of turbulence to the practical choices professionals make in the field.

Table of Contents
Why wind matters for microphones
Sound is pressure variations in the air, and microphones translate those tiny pressure fluctuations into electrical signals. When air moves irregularly across a microphone capsule, it produces pressure spikes that are not related to the desired sound source. Those spikes often manifest as low-frequency rumble, popping, and distortion that mask speech and musical detail.
Wind noise is fundamentally different from acoustic sound: it is a hydrodynamic phenomenon caused by the interaction between airflow and physical boundaries. Microphone diaphragms are designed to respond to acoustic wavelengths, not to the direct impact of moving air, so wind introduces unwanted mechanical loading on the diaphragm. The result is a signal dominated by transient, broadband energy that engineers identify as wind noise.
How a windshield reduces wind noise
A windshield acts as an intermediary between the free air stream and the microphone diaphragm, converting turbulent, high-velocity flow into smooth, low-velocity motion. It does this primarily by dissipating kinetic energy through viscous friction inside porous materials or by redirecting airflow around a protected cavity. The net effect is the attenuation of low-frequency pressure fluctuations that would otherwise drive the microphone diaphragm erratically.
Acoustically, the windshield forms a low-pass filter for non-acoustic pressure events while allowing true acoustic waves to pass with minimal alteration. The design aims to lower the amplitude of turbulent pressure across a broad low-frequency band without imposing excessive coloration on the wanted sound. That balancing act—reducing wind-induced pressure while preserving acoustic fidelity—is the core engineering challenge of windshield design.
Physical mechanisms: absorption, scattering, and damping
Inside a foam or furry cover, airflow loses energy through viscous drag and small-scale turbulence; the fibers convert kinetic energy into heat and distributed pressure changes. This absorption reduces the dynamic pressure hitting the capsule and attenuates large, sudden impulses. Scattering from the rough surfaces also breaks up coherent eddies into smaller vortices that are less effective at forcing the diaphragm.
In larger solutions like blimps, the windshield provides a staged defense: an outer porous layer breaks bigger gusts, a free-air cavity reduces pressure transmission, and inner baffling dampens remaining turbulence. Those layers act together to smooth the pressure field, giving the microphone a calm acoustic environment even when the external air is restless. The result is more predictable, usable audio.
Types of wind protection and how they differ
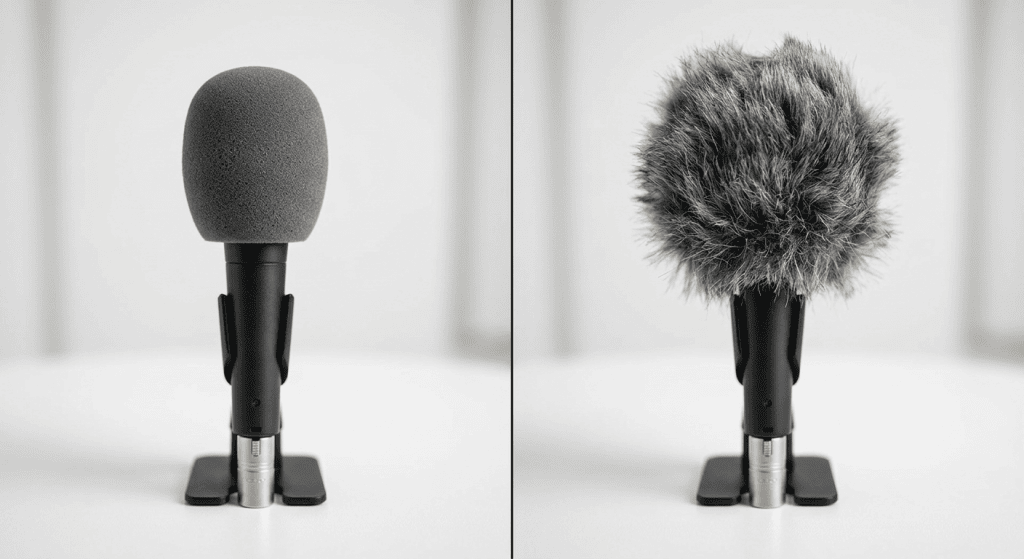
Wind protection comes in several flavors, each optimized for particular uses. Foam windscreens are common on handheld mics and lavaliers; furry covers, often called “deadcats,” are used for portable shotgun and lavalier mics outdoors; larger systems like zeppelins or blimps encase the microphone in a staged enclosure for field recording and film. Each approach trades off size, weight, and attenuation characteristics.
Foam covers primarily absorb small-scale airflow and are effective against breath pops and light wind. Furry covers add an outer fur layer that breaks up larger eddies before they reach the foam, greatly improving performance in stronger winds. Blimps and windshields use spatial separation—the microphone sits inside a cavity—to further reduce pressure fluctuations and protect against severe gusts. Choosing between them depends on the environment and the microphone type.
Foam cover microphone function
The foam cover microphone function is to reduce direct air impact and to moderate short, high-energy pressure changes. Open-cell foam presents a network of tiny passages that progressively dissipate airflow energy as it moves toward the capsule. Because foam is lightweight and minimally invasive, it is widely used on broadcast and studio mics where breath and plosive control is necessary without dramatic tonal change.
Foam adds a small amount of high-frequency absorption that can slightly soften the top end, but a well-designed foam windscreen maintains a flat acoustic response across most useful frequencies. Its simplicity makes it a practical first line of defense, and it pairs well with pop filters in studio settings to handle spoken plosives and close-miking artifacts. For outdoor use, foam alone often falls short in stronger winds, which is where layered systems come into play.
How microphone windshield works on shotgun and directional mics
Shotgun microphones rely on interference tubes and their own directional characteristics to reject off-axis sound. When exposed to wind, their long, narrow design can convert air movement into pressure variations along the tube, producing noise and comb filtering effects. Windshields for those mics must therefore mitigate both the general turbulence and the tube-specific interactions that create unwanted spectral artifacts.
A properly designed windshield for a shotgun mic often combines an outer fur layer, an inner foam insert, and a mechanical shock mount to isolate the capsule from structure-borne noise. The outer fur disrupts large gusts, the foam dissipates residual airflow, and the mount prevents handling or wind-induced vibrations from reaching the capsule. Together these elements preserve the microphone’s directional behavior while controlling wind-related problems.
Wind noise reduction microphone strategies
Effective wind noise reduction microphone strategies start with matching the protection to the expected wind strength and the microphone’s sensitivity. For light breezes, foam alone may suffice; for moderate winds, a furry cover is advisable; for heavy wind, a blimp with multiple layers and a shock-mounted capsule is preferred. The correct choice reduces the need for post-processing and preserves the natural tonal balance of the source.
Placement and orientation also matter: keeping the mic shielded behind physical barriers, positioning it closer to the source, or using the speaker’s body as a windbreak will reduce incoming airflow. Engineers sometimes employ low-frequency high-pass filters as a complementary step, but relying solely on electronic filtering sacrifices low-frequency content and can introduce phase shifts. Physical wind protection remains the most transparent solution.
Material science behind windshields
The acoustic performance of a windshield depends on material properties such as porosity, pore size distribution, fiber stiffness, and thickness. Open-cell foams provide a tortuous path for air, and their acoustic impedance is tuned by controlling cell size and density. Similarly, synthetic fur combines long fibers for initial eddy breakup with a backing that supports inner layers.
Designers measure airflow resistance and acoustic impedance to predict how a material will interact with both wind and sound waves. Too dense a material chokes desirable acoustic energy and causes tonal coloration; too open, and it fails to dissipate turbulence. Optimal designs achieve a compromise where airflow kinetic energy is reduced while acoustic transmission remains efficient across the audible band.
Porosity and acoustic transparency
Porosity determines how easily air and sound pass through a layer. In wind protection, a graded porosity—coarser on the outside, finer inside—generally works best. The coarse outer layer breaks up large eddies without reflecting sound, while the finer inner layer damps small-scale motion that could reach the capsule. This gradation preserves acoustic transparency while maximizing wind attenuation.
Acoustic transparency can be quantified by measuring the transfer function between outside pressure and the pressure at the microphone position. Engineers aim for a flat transfer function for true acoustic sources, while selectively attenuating irregular, wind-induced pressure components. Material selection is therefore an exercise in balancing porosity with damping characteristics.
How a windshield interacts with frequency response
Any material placed in front of a microphone will alter its frequency response to some degree. Windshields primarily affect low frequencies by attenuating the large-scale pressure changes caused by wind, but they can also introduce slight high-frequency absorption or scattering depending on fiber structure and thickness. Awareness of these tendencies helps engineers choose solutions that maintain the timbral integrity of speech and instruments.
For high-fidelity recording, the best windshields minimize amplitude and phase distortion across the passband while providing substantial low-frequency suppression of non-acoustic events. In many field setups, a modest high-frequency roll-off from an outer furry cover is an acceptable trade-off for dramatically reduced wind rumble. Microphone capsules with less intrinsic low-frequency sensitivity are also more tolerant of windshield-induced changes.
Polar patterns and windshield effects
Windshields can influence a microphone’s polar pattern when they create asymmetric airflow or change the acoustic inlet geometry. Directional mics are especially sensitive because their response relies on precise timing and phase relationships across the capsule. Careful design and symmetrical mounting ensure that wind protection does not impair off-axis rejection more than necessary.
For omnidirectional microphones, the windshield’s impact on polar response is usually minimal because these mics are less dependent on phase cancellations. However, any added mass or mechanical coupling to the microphone body can still affect resonance and handling noise, so suspension mounts and lightweight materials remain important considerations across polar patterns.
Practical deployment: mounting and placement
How a windshield is attached and where the microphone sits inside it contribute strongly to overall performance. For example, shotgun mics placed off-center in a blimp can experience residual turbulence or reflections that degrade directivity. Proper mounting centers the capsule within the inner cavity and decouples it from mechanical supports to avoid structure-borne noise transmission.
Leave some space between the capsule and the inner protective layer; that free-air gap acts as a buffer and prevents direct conduction of turbulent pressure. For handheld microphones, a snug foam cover works well because the mic is close to the mouth and plosive energy is captured at the foam surface rather than the capsule. In all cases, a secure fit that minimizes movement relative to the mic body is essential for consistent results.
Using windshields in live sound and broadcast
Broadcasters often combine foam windscreens with internal pop filters to control breath noise without removing the mic’s presence or clarity. In live environments, handling noise and sudden gusts require additional mechanical isolation, such as elastic shock mounts or pistol grips with suspension. Sound engineers tailor the solution to the mobility and appearance needed on camera as well as acoustic performance.
For outdoor news gathering, the standard kit includes foam for quick set-ups and furry “deadcat” covers for on-site interviews in the wind. Film and nature recordists rely on larger blimps and boom suspension systems because capturing low-level detail with minimal post-processing is critical. The right deployment minimizes retakes and preserves natural ambient soundscapes.
Measurement and testing of windshields
Manufacturers and acousticians test wind protection using wind tunnels, calibrated fans, and measurement microphones to quantify attenuation across frequency bands. Tests often measure the spectral content with and without the windshield under controlled gusts, producing transfer curves that show where wind noise reduction is most effective. Those curves guide selection for different wind regimes and microphone types.
Another useful metric is the signal-to-noise ratio improvement for a given wind speed. Practical testing also includes real-world scenarios—outdoor dialogue, ambient sound capture, and sporting events—because controlled tests cannot reproduce every turbulence pattern. Field verification ensures that laboratory advantages translate to usable audio in actual shoots.
Acoustic modeling basics
Modeling wind behavior around a microphone combines computational fluid dynamics (CFD) with acoustic transfer models; CFD predicts flow patterns and pressure fluctuations while acoustic models simulate how those fluctuations couple to the diaphragm. Because full CFD is computationally expensive, designers often use simplified approximations for early-stage material selection and reserve detailed simulations for critical designs.
Simplified models can estimate the reduction in dynamic pressure based on porosity and layer thickness, and empirical formulas relate airflow resistance to attenuation. These tools help create prototypes quickly, but they are not substitutes for measured transfer functions and listening tests, which remain the ultimate arbiter of performance. The human ear still defines acceptability for most audio applications.
Limitations and trade-offs
No windshield is perfect. The most effective wind protection tends to be larger and heavier, which may be impractical for handheld or hidden applications. Moreover, excessive damping can remove desirable low-frequency content from the intended audio source, making voices sound thin or instruments lose weight. Designers therefore must trade-off between noise suppression and tonal preservation.
Another limitation is the potential for internal resonances or reflections within multi-layer systems, which can create subtle coloration. Shock mounts and carefully matched materials reduce these effects, but there is always a balance between robust suppression of turbulent energy and maintaining an honest reproduction of the acoustic scene. Experienced engineers accept certain compromises to achieve reliable outdoor performance.
When electronic solutions help—and when they don’t
Electronic filters and post-processing can remove residual low-frequency wind noise, but they cannot restore clipped or severely distorted signals caused by direct gusts. High-pass filters are a useful complement, especially when combined with physical protection, because they remove persistent rumble without introducing mechanical changes. Adaptive noise reduction algorithms can also help but risk altering timbre and transient detail.
Ultimately, physical wind protection reduces the need for aggressive electronic correction. That preserves dynamic range and transient integrity, both of which are difficult to reconstruct once lost. The smart workflow is to prevent the problem at the source and then apply gentle processing for minor cleanup if necessary.
Maintenance, care, and longevity
Windshields are exposed to dirt, moisture, and oils from hands and breath, which degrade performance over time. Regular cleaning—vacuuming furry covers, washing foam in mild detergent and air drying, inspecting seams and mounts—extends their useful life and maintains consistent acoustic behavior. Avoid harsh chemicals that can change material porosity or degrade adhesives and seams.
Inspect internal shock mounts and suspension bands for wear, and replace foam inserts that have compressed or become brittle. In marine or dusty environments, consider having spare covers on hand; replacing a contaminated layer is far cheaper and faster than replacing the microphone or attempting complex restoration. Routine care protects both performance and investment.
Choosing the right windshield for your application
Selection depends on budget, expected wind speeds, microphone type, and how much weight or bulk you can tolerate. For indoor dialogue and studio voice work, a foam cover and pop filter are usually adequate. For outdoor interviews, field reporting, or wildlife recording, a furry cover or blimp assembly is often the better choice. The goal is effective wind noise reduction with the least practical impact on sound quality.
Consider microphone sensitivity and polar pattern when choosing protection: highly directional mics and very low-noise capsules demand higher-quality windshields to avoid introducing artifacts. Test candidates in representative conditions and listen critically to how each option affects both the desired signal and the residual noise. Real-world auditioning beats theory when stakes are high.
DIY approaches and when they work
Simple DIY solutions—socks over a foam cover, faux fur glued to frames, or small mesh cages—can work for casual recording and learning applications. These quick fixes mimic the underlying principles: create an initial layer to break up eddies, an inner layer to dissipate remaining motion, and some mechanical isolation to reduce handling noise. They are cost-effective ways to explore trade-offs and principles without large investment.
However, DIY options rarely match the material science and mounting precision of professional products. For critical commercial projects, validated aftermarket windshields and proper suspension rigs deliver predictable results and save time in post. When reliability matters, invest in tested solutions rather than relying solely on improvisation.
Microphone wind protection explained for different recording scenarios
In documentary and field recording, capturing ambient detail while controlling wind demands neutral, minimally intrusive protection. Engineers favor blimps and shock mounts that preserve the soundstage and reduce wind noise in the low end. In broadcast, appearance on camera and ease of deployment often require compact solutions like foam or discreet furry covers that still provide adequate suppression.
Theatrical and studio applications emphasize tonal consistency and the ability to move microphones without introducing handling noise. Specialized pop filters and microphone booms with internal shock mounts mitigate breath and plosive artifacts without excessive bulk. Each scenario has established best practices grounded in the acoustic principles covered earlier.
What does a microphone windscreen do for podcasts and streaming
For podcasters and streamers, a foam windscreen reduces plosives, minimizes breath noise, and provides modest wind protection for outdoor streams. It also prevents buildup of saliva and moisture on the grille, extending the microphone’s hygiene and lifespan. Because most podcasting takes place in controlled environments, foam balances convenience and performance effectively.
When mobile streaming or outdoor content is part of the workflow, adding a furry cover or using a windshield designed for the specific microphone brings audible benefits. The right choice reduces post-production cleanup and keeps the voice present and natural, which is crucial for listener engagement. Small investments in protection pay large dividends in perceived quality.
Summary of acoustic principles in practice
Wind protection works by converting damaging kinetic energy into distributed, less harmful forms before it reaches the diaphragm. Materials and structures are selected to scatter and absorb turbulent eddies while allowing sound waves to pass. The best designs engineer porosity, thickness, and internal geometry to selectively attenuate non-acoustic pressure without undermining fidelity.
Awareness of the microphone’s inherent behavior—sensitivity, polar pattern, and intended use—guides the choice of windshield. Field tests and measurements validate theoretical expectations and help optimize the trade-offs between attenuation, coloration, and usability. Good wind protection is thoughtful, not merely bulky: it anticipates real-world demands and accommodates them gracefully.
Final thoughts and practical closing guidance
Understanding how microphone windshield works gives technicians and creators the tools to choose the right protection for each situation. A well-chosen windshield solves more problems than it creates: it preserves low-frequency clarity, reduces intrusive rumble, and keeps the signal usable without heavy-handed processing. Investing time in matching protection to environment improves recordings and reduces headaches down the line.
When setting up for any outdoor or semi-outdoor shoot, budget a few minutes for testing one or two windshield options, check placement and suspension, and listen critically. These small steps are often the difference between a usable take and an unusable one. With attention to the acoustic principles described here, wind noise becomes a manageable variable rather than an unavoidable disaster.